Showing posts with label Chipboard Album/Book. Show all posts

Tuesday, June 28, 2011

CTMH - Fanfare Album - Stage 1..... Covering the Pages

Stage One -

This is the beginning of the journey to creating my Close To My Heart - Fanfare album.

In this stage, I will walk you step by step with pictures and illustrations of how I:
     * Decided the order and layout of my album pages
     * Covered the Pages with Coordinating Paper
     * Distressed and Finished the Edges getting rid of all the uneven plain edges
     * Step By Step for one complete page and finishing with pictures of all six pages


I decided I liked the pages to open with the shortest in the front to the longest tab in the back..... I wanted to see the tabs behind the next sticking from behind.... with the exception of the Cover Page!

Z1224 My Creations™ All-Sorts Mini Album

Once you decide on the patterned paper you want to use for each side you simple lay it on the back of the paper you want to cover it with - trace around the edges leaving a tiny bit of space for errors - then carefully trim out your pattern (I use a blade but you can just as easily use a pair of sharp scissors) 


I like to leave a bit of an overhand on the straight edges so I can fold it over  - it makes for a bit more of an interesting look when you start distressing those edges...... but this is personal preference.... and not necessary! Trimming to the edges is just fine and will give you a wonderful result as well! 

Next add glue all over the board - then carefully spread it out evenly so you cover all the edges well and place the paper lined up on the board .... carefully smoothing out all the bubbles and making sure all the edges are tacked down well!

Here is what my first page looks  like as again I prefer to work with a bit of an overhang on my straight edges to add a little pizzaz to my distressing later...... 

When and were you punch the holes for your rings is personal preference...... with this book I liked the precut holes layout and decided to stick with them and only needed to cut the paper to match up once I had each side glued down.....
However, the reason I cut the wholes after I glue down the cover paper is because if you don't like the layout of the factory precut holes - you have the flexibility to change them by simply cutting new holes after you glue down your paper and leaving the precut holes covered permanently! 

This is what the unfinished side of my page looks like after covering the opposite side....... 

Close up of how I trim away all the extra paper left hanging over my edges prior to covering the backside of the page..... this makes for less sanding down the line........... be careful not to trim into the chipboard....

This is how one side of my first covered page.......

This is the backside of my first covered page.......

This is a close up of how your unfinished edges might look...... you can see the paper sticking just a bit out on both sides and you can see the bare chipboard sticking from the middle....... yuk! Time to clean that up! Get out your Close To My Heart - Distressing Kit..... and Your Inks! 

For Distressing the edges .... I love to use the sanding file provided in the distressing kit from "Close To My Heart"


Z1299 Distressing Kit


I love how the idea books give you the exact perfect matches to use with each of the  current kits..... for the Fanfare Collection the inks are............. 

Sunny Yellow, Sky, Pacifica, and Cranberry!


SUNNY YELLOW EXCLUSIVE INKS® STAMP PAD


I like to start with my lightest color first for edging.... I used Cranberry then Pacifica ....... 

Here is after both colors were applied..... see how the red kinda peeks from behind the blue...... I just like how that looks.... but you can just use one color if you prefer.... no rules! LOL!

Same on this side..... first I used the Cranberry to ink the edges...... 

Then I went over the edges again lightly with the Pacifica...... 

Close up of my edges after distressing and inking..... very different than the earlier pictures.... right!


I also used a paper edge punch to make my front cover and back covers pop..... I took a piece of the red card stock paper from the kit and used my stars paper punch to cut down one side and then laid it on top of the yellow paper from the kit and attached that strip to the stars paper using liquid glass and completing the look with a thin layer spread over the red strip to give a nice little contrast from the flat blue paper....... liquid glass is awesome stuff.... you can use it to create a glass shiny look to almost anything... you can use it to attach embellishments to paper..... you can use it to attach paper to paper like glue...... it has endless possibilities.....


Z679 Liquid Glass

I hope you enjoyed this stage one demonstration..... if you have any questions please don't hesitate to send me a comment of contact me by email...... I love to hear your ideas and comments!!!!


I will be covering Stage Two Next....... Adding Decorations, Adornments, Hidden Goodies (Pockets, Tags, Compartments, ect....) To your Pages....... I hope to have this segment completed by Thursday...... or sooner..... It will all hinge on how much my little one will permit me to get done! LOL! As you know..... he is the boss! (Well at least he thinks he is and I pay dearly if I don't listen....... LOL!)
Here are all six of my completed pages after I repeated the above steps used for the demo page outline in stage one.....  I used different patterns and even cut some pages short and added extra strips of contrasting paper to give it some extra interest...... not necessary but just my little funky style!
Until Stage Two.... Enjoy, and don't forget to order your Fan Fare Kits Today so you can play along with me as I create lots of neat goodies using this beautiful collection of papers!

Ciao! Shelley!
XOXOXOXOXOXOXOXO

Close To My Heart Chipboard Album Anyone???

What do you get when you combine:


Z1224 My Creations™ All-Sorts Mini Album - $5.95 Album - 6 chipboard pages, featuring 5 different page designs, 6 1/4" x 7" 


G1021 Fanfare Workshop Kit $29.95 Complete Kit that you will have tons left over from after making this album......

Fanfare Level 2 Paper Packet - 24 sheets of 12"x12" paper


My Acrylix® Fanfare Workshop B-size Stamp Set


Buttons Blue Assortment - Tons of Buttons - really pretty ones too!!!!


Embroidery Floss Neutral Assortment - Need I say more!

PLUS LOTS MORE......... TO MAKE CARDS - LAYOUTS - PLUS!!! 
Workshop Guide
 - This workshop guide will also guide you through how to create cards and page layouts with all the left over paper you will have from this set!!! This is a lot of product for $29.95....... I mean the stamps alone are awesome!!!!


X7125C Zippidee Level 2 My Stickease® Assortment - $3.25 for 2 sheets of stickers


WELL CHECK BACK LATER TO SEE....... I HAVE A SPECIAL SURPRISE IN THE WORKS..... PERFECT FOR YOUR NEXT SPECIAL BIRTHDAY ALBUM! 

Now it is time for me to start creating...... be back soon with step by step progress shots..... 

PS majority of these items are on sale right now in my store!!!!! Just click on the links to go directly there....... then we can create together! 

Ciao! 

Tuesday, June 14, 2011

My first Chipboard Book!

Happy June 14th everyone! I know it has been ages since my last post and I am sorry! Been so much going on personally...... the most horrifying of whcih was discovering this  tiny bump on my 3 year old's tummy (he is now 4 - June 7th!) was an MRSA infection! Of course not any old MRSA infection either..... one really bad bug as his doctor put it......highly resistant - only 3 antibiotics on the planet worked against it .... 2 needing IV to administer BAD BUG! But fast forward..... and Praise God after my wonderful brother, an anointed pastor prayed for him over the phone.... he is 100% better!  So my mind is finally able to rest and my hands able to create again!

AND........ learning how to make Chipboard / Paper bag Books also called albums has been my latest conquest!  I absolutely love the look of Chipboard books with all their frilly ribbons and colorful pages loaded with all sorts of cute embellishments and hidden surprises unveiled page by page.... don't you? Well, admittedly (until now) I had no idea or should I say no guts to brave the world of making one myself and always ordered them  from others... ( which I don't regret either .... they are priceless treasures I adore, proudly display and would absolutely buy more....) if I didn't know how to now make my own.... then again, who knows I honestly have to say I will still buy others because lets face it there are some really talented ladies out there and I do love other's styles as much as my own!) Variety is truly the spice of life!!!!


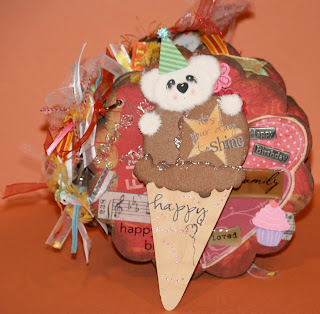


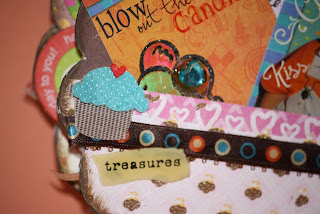


I made this book for my mother in law for her birthday this past week...... it was so much fun and can you believe I just sat down about 9 pm one night searched youtube for a video and funny enough only watched about 1/4 of it and went to town creating ....... and several hours later (yeah I was pumped and sleep took a back seat....LOL!) I had this absolutely adorable book! I don't know what made me happier? Watching the look on her face when she opened it or the feeling I had knowing I finally made one.... and one I would have ordered from someone else.... cuz let's face it..... there is tons of fabulous talent out there but also tons of lets just say ...... still needs a bit of work before you post those pics or sell it on Ebay talent too! Not that some may not feel that way too about my work but......crafters......... we are all in this together and most of us really do pour our hearts into our work for the joy of being creative....... yes, we may also sell on ebay or etsy here and there...... but I have been steaming a while about this ............... it absolutely burns me up when I see listings of those just trying to turn quick sales -  making those extremely cheaper versions (computer printed.... hence computer made not by hand...paper pieces!) list in the same categories and identical keywords/titles as the ones I and many others work so very hard to make truly by hand.... drawing, cutting, inking, assembling several tiny pieces into the top quality "Hand-Made" creations! Ok, yes, they DO put those disclaimers that they are in not so many words.... cheap computer made! But those that are passing off these colored print outs with a couple of pop dots as a hand made paper pieced items seriously really do undermined a true crafter's work! Thus, scaring off buyers.......... come on who can't print a picture twice, trim around it, glue them together a top the other with a few pop dots........ art? Well my 4 year old is ready for his first eBay business then as a top artist!!!

Please don't compromise quality for quantity just to make a quick buck..... your work is your signature and if you take the time, supplies and  energy to make it..... always make it YOUR personal best! Ok, I am done venting and hopefully I don't get to much hate email or postings after this one...... was just in a mood this morning and finally said what I have been feeling for a long time!

SVGs Patterns & More!