Stage One -
This is the beginning of the journey to creating my Close To My Heart - Fanfare album.
In this stage, I will walk you step by step with pictures and illustrations of how I:
* Decided the order and layout of my album pages
* Covered the Pages with Coordinating Paper
* Distressed and Finished the Edges getting rid of all the uneven plain edges
* Step By Step for one complete page and finishing with pictures of all six pages
I decided I liked the pages to open with the shortest in the front to the longest tab in the back..... I wanted to see the tabs behind the next sticking from behind.... with the exception of the Cover Page!
 |
| Once you decide on the patterned paper you want to use for each side you simple lay it on the back of the paper you want to cover it with - trace around the edges leaving a tiny bit of space for errors - then carefully trim out your pattern (I use a blade but you can just as easily use a pair of sharp scissors) |
 |
| I like to leave a bit of an overhand on the straight edges so I can fold it over - it makes for a bit more of an interesting look when you start distressing those edges...... but this is personal preference.... and not necessary! Trimming to the edges is just fine and will give you a wonderful result as well! |
 |
| Next add glue all over the board - then carefully spread it out evenly so you cover all the edges well and place the paper lined up on the board .... carefully smoothing out all the bubbles and making sure all the edges are tacked down well! |
 |
| Here is what my first page looks like as again I prefer to work with a bit of an overhang on my straight edges to add a little pizzaz to my distressing later...... |
 |
When and were you punch the holes for your rings is personal preference...... with this book I liked the precut holes layout and decided to stick with them and only needed to cut the paper to match up once I had each side glued down.....
However, the reason I cut the wholes after I glue down the cover paper is because if you don't like the layout of the factory precut holes - you have the flexibility to change them by simply cutting new holes after you glue down your paper and leaving the precut holes covered permanently! |
 |
| This is what the unfinished side of my page looks like after covering the opposite side....... |
 |
| Close up of how I trim away all the extra paper left hanging over my edges prior to covering the backside of the page..... this makes for less sanding down the line........... be careful not to trim into the chipboard.... |
 |
| This is how one side of my first covered page....... |
 |
| This is the backside of my first covered page....... |
 |
| This is a close up of how your unfinished edges might look...... you can see the paper sticking just a bit out on both sides and you can see the bare chipboard sticking from the middle....... yuk! Time to clean that up! Get out your Close To My Heart - Distressing Kit..... and Your Inks! |
 |
For Distressing the edges .... I love to use the sanding file provided in the distressing kit from "Close To My Heart"
|
 |
| I love how the idea books give you the exact perfect matches to use with each of the current kits..... for the Fanfare Collection the inks are............. |
 |
Sunny Yellow, Sky, Pacifica, and Cranberry!
|
 |
| I like to start with my lightest color first for edging.... I used Cranberry then Pacifica ....... |
 |
| Here is after both colors were applied..... see how the red kinda peeks from behind the blue...... I just like how that looks.... but you can just use one color if you prefer.... no rules! LOL! |
 |
| Same on this side..... first I used the Cranberry to ink the edges...... |
 |
| Then I went over the edges again lightly with the Pacifica...... |
 |
| Close up of my edges after distressing and inking..... very different than the earlier pictures.... right! |
 |
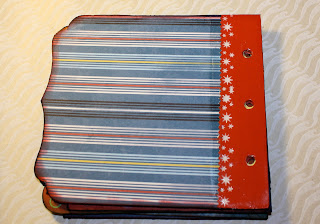
I also used a paper edge punch to make my front cover and back covers pop..... I took a piece of the red card stock paper from the kit and used my stars paper punch to cut down one side and then laid it on top of the yellow paper from the kit and attached that strip to the stars paper using liquid glass and completing the look with a thin layer spread over the red strip to give a nice little contrast from the flat blue paper....... liquid glass is awesome stuff.... you can use it to create a glass shiny look to almost anything... you can use it to attach embellishments to paper..... you can use it to attach paper to paper like glue...... it has endless possibilities.....
Z679 Liquid GlassI hope you enjoyed this stage one demonstration..... if you have any questions please don't hesitate to send me a comment of contact me by email...... I love to hear your ideas and comments!!!! |


I will be covering Stage Two Next....... Adding Decorations, Adornments, Hidden Goodies (Pockets, Tags, Compartments, ect....) To your Pages....... I hope to have this segment completed by Thursday...... or sooner..... It will all hinge on how much my little one will permit me to get done! LOL! As you know..... he is the boss! (Well at least he thinks he is and I pay dearly if I don't listen....... LOL!)
 |
| Here are all six of my completed pages after I repeated the above steps used for the demo page outline in stage one..... I used different patterns and even cut some pages short and added extra strips of contrasting paper to give it some extra interest...... not necessary but just my little funky style! |
Until Stage Two.... Enjoy, and don't forget to order your Fan Fare Kits Today so you can play along with me as I create lots of neat goodies using this beautiful collection of papers!
Ciao! Shelley!
XOXOXOXOXOXOXOXO


